Bill vs the quarter

Bill vs the quarter


I started a new hobby this summer. Actually, I revived an old hobby, but I’ll get to that.

I’m currently in graduate school so most of my free time is spent doing homework on a computer (outside of time spent with my wife). Because I was and am spending so much time on a computer, I decided that I needed a hobby that didn’t involve looking at a computer screen. This decision was primarily for the benefit of my sanity. I code at work then I code at home. There had to be a change of pace.

After some time spent fondly reminiscing yesteryear, I found myself wanting to paint models. Long before I was born,  my grandfather painted model planes. When I was young, I received these model planes as well as your standard model painting kits (along with a sweet collection of model paints). In high school, I was a big fan of anime and painted some scale models of Gundam Wing mechs (giant humanoid robots). However, in all of my modeling efforts, I didn’t spend a huge amount of time learning techniques. At the time, it would have involved buying books or scouring the Internet and I wasn’t up for that. I remember feeling proud of my results, but always looking at the box art and thinking “how the heck did they do that?” There was so much detail and precision and my attempts seemed sloppy by comparison.

Now it’s 2010 and I was re-investigating the hobby. My hope is to be serious and to invest in some good quality materials. For what to paint, I had the following equation in mind:

SCI-FI + GUNS + PAINTING = WIN

Box art

I landed on Warhammer 40,000. I bought a starter set called “Assualt on Black Reach” that I recall my friend Alan purchasing many years prior. The set comes with some space marines and orks and it matches my equation to a t. On top of being a high quality set of stuff to paint, I discovered that YouTube has some great tutorial material for 40K miniatures (like http://www.youtube.com/user/awesomepaintjob). I did plenty of research, bought the paints I wanted and all the other materials that were needed, and I started on my first space marine.

pre-primer

I put my model together (and got super glue on my fingers in the process), primed him, which was one of the first things that I learned that I should be doing to models, then started painting. The other day, Elease was looking at my model after I had completed one of my rounds of painting and she said “What is his name?” For some reason, without hesitation, I answered “Bill.” I finished Bill yesterday during a brief homework break and today I’m presenting him to the world. Certainly, Bill has imperfections, but when you paint a miniature that is barely larger than a quarter, what can you expect? I’m looking forward to gaining more skill in painting and maybe even moving into airbrushing at some point (read: fancy-pants model painting).

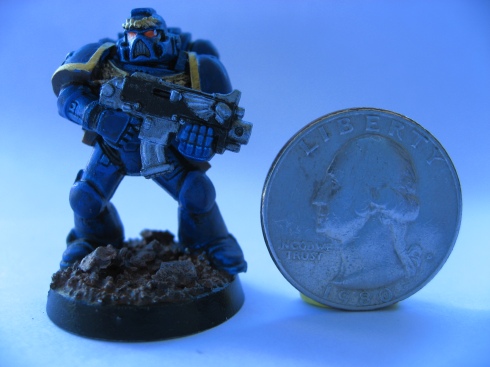
post-primer

I just spent a lot of time setting up a website at http://matthewlayman.dyndns.org and, wow, it was a lot of work. If you ever want to learn a lot in a short amount of time, try starting a local webserver on your home network. I learned about Apache, web hosting, DDNS, DMZ, port forwarding, lynx, Planet!, Google Picasa’s data API, jQuery, and DynDNS.

The site is running on an ancient desktop from 2002, but it’s only serving a static HTML page that has some dynamic content to load stuff from elsewhere on the Internet. Hopefully it won’t fall over from all the imminent server load. 😉

Thanks to Paul Hummer for pointing me at DynDNS. I thought I was stuck.

I’ve never really spent time with Java. My experience with the language was limited to examining Java code in books on design patterns. I am now taking a class at Johns Hopkins University that uses Java, so it was time for me to learn how to work with the language. This post describes my initial experience with the Java environment and points a new user to some good tools that are used by “enterprise” Java developers.

My employer produces a lot of Java code for its customers. I have many co-workers who use Java regularly, and, in my conversations with them, I’ve heard of some popular tools that make Java development easier. The two primary tools seem to be Eclipse [1], an Integrated Development Environment (IDE), and Maven [2], a project management/build tool. Also, M2Eclipse [3], which integrates Maven and Eclipse, comes highly recommended by my peers.

With these tools, I set up a “Hello World!” application on Ubuntu 9.10. Some of the steps turned out to be easy, while others were surprisingly annoying and tedious. Hopefully, this post can help a new Java developer avoid those stumbling blocks.

First, install Eclipse and Maven: `sudo apt-get install eclipse maven2`.

Second, install the M2Eclipse plugin. The free M2Eclipse PDF book gives instructions about how to install the plugin from inside Eclipse’s software manager. One gotcha that I ran into was needing a JDK (Java Development Kit) for Eclipse to use when installing M2Eclipse. Ultimately, I just needed to install openjdk (`sudo apt-get install openjdk-6-jdk`). Eclipse switched to the JDK because the act of installing openjdk changed the symlink that /usr/bin/java pointed to. To check which Java is being used, execute `sudo update-alternatives –config java` (note: that’s two dashes before config).

Once the JDK is installed, use the Eclipse software manager under “Help -> Install New Software…” to install the dependencies listed in the M2Eclipse book. This stage was pretty annoying because Eclipse can’t resolve dependencies, but it had to be done.

Next, create a project within Eclipse using Maven. To do this, select “File -> New -> Project…” and go to the new Maven section. Select “Maven Project” and move through the wizard until Maven asks about archetypes. What are archetypes? Archetypes are basically project templates with certain conventions for consistency in Maven projects. Select the archetype with ArtifactId ‘maven-archetype-quickstart’ to create a basic project.

Now right click the package in the Package tree, and select a Maven action (a.k.a. goal) from the “Run As” menu. “Maven package” will create a jar in the target directory. However, if you try to run that with `java -jar <your-jar-name-here>`, it will fail because the jar can’t find the main() method. To fix that problem, follow Jean François’ instructions [4] (look for the section about build plugins).

This was a condensed walk-through for making a project in Eclipse with Maven. Virtually everything listed here can be found in the documentation listed at each tool’s respective site. If you have questions, leave a comment and I’ll try my best to answer. The benefits of using Maven and Eclipse are numerous, but suffices to say it should now be possible to handle Java dependencies well in a robust IDE.

  1. http://www.eclipse.org/
  2. http://maven.apache.org/
  3. http://m2eclipse.sonatype.org/
  4. http://jean-francois.im/2008/02/why-maven-2-rocks.html

I have a soft spot in my heart for Perl. It was the first language that I made any serious use of as a professional software developer. I’ve learned a lot from Perl and about Perl, and I know that the language has a reputation for being ugly. So how does a developer transform an “ugly” language into something special and possibly even “pretty?”

In the Perl community, the proposed question might be met with reactions of “TIMTOWTDI!” (pronounced “Tim Toady” and representing the very long acronym of “There is more than one way to do it!”) After all, they might say, what is “pretty” code? To me, pretty code is code that is maintainable, robust, and fast, probably in that order of preference. I think that there exists a book about Perl that illustrates how to write pretty code (per my definition) and here are my thoughts about it:

Last week I finished reading a book written by a well respected individual in the Perl community. Like Douglas Crockford with the JavaScript language (whom I mentioned in my previous post), this author is someone who has had a presence in Perl and really knows his stuff because of years of experience. The book is Perl Best Practices and the author is Damian Conway. Unlike Crockford’s JavaScript: The Good Parts, Conway’s book is much larger and spans more than three times the number of pages of Crockford’s 153 page book. Damian uses that space quite effectively and provides some great insight into how to write better Perl code.

Perl Best Practices is not a book for fledgling Perl developers. If you’re learning Perl syntax for the first time, look elsewhere (e.g. Programming Perl or Perl in a Nutshell), however, be sure to come back quickly to this book! The real strength I see in Perl Best Practices is the overarching guidance about how to craft Perl code into something maintainable by people. For code to be effective, it cannot exist in a vacuum. The best code is used and read and maintained by many people. Conway’s book explains some critical concepts to write rich code, but he writes it in a way that emphasizes how to make the code safe in the future and update-able to others. After reading Perl Best Practices, I feel better equipped  to write Perl code that other developers would value. I would love for those hypothetical developers to look at my future work and say “Oooo… that’s pretty!”

I used to loathe JavaScript. It was a language that looked ugly, had no obvious structure, and seemed like a toy that web developers would use. Then I read “JavaScript: The Good Parts” by Douglas Crockford and my viewpoint changed for the better. I’ve now seen that JavaScript can still be the hopeless mess that I just described, but it can also be something “beautiful” if done with care.

Crockford is the JavaScript architect over at Yahoo! and he is a man who clearly knows his stuff. Over the span of 153 pages, he explains many of the finer points of the popular web language. His book is quick to illustrate that there are some very bad parts in JavaScript, and he is not afraid to call out “mistakes” in the design of the language. I found this honesty to be very refreshing. I’ve read numerous language books that will want to highlight every feature of a programming language, but not point out which parts were a bad idea. Instead, those books will let you discover yourself, on your own projects, what are bad ideas and what are good ideas. To admit that a language has problems and point out features that should absolutely not be used is great. It means that I get to learn less to be more productive and, in this case, benefit from the wisdom and experience of someone who has been working with JavaScript for years.

Overall, the book is excellent. It’s definitely not light reading and if you choose to read it, it will require your careful attention to grasp the subtle points. However, the time spent trying to understand the material will be a boon to any serious web developer who has to write more than a few lines of JavaScript. And since so much of the web uses JavaScript to create dynamic pages, I think all web developers should know this stuff.

I just announced it officially on the team’s Launchpad page, but Entertainer 0.4 is out. Check out the installation instructions on the wiki for the play by play of how to get things going.

Thanks to all the other developers who help make Entertainer possible. You guys rock.

I just finished reading Perl Testing: A Developer’s Notebook by Ian Langworth and chromatic (yes, one of the authors identifies himself/herself as “chromatic,” presumably for privacy concerns). All in all, the book was eye opening in understanding the world of testing in Perl. I develop Perl code at work in a culture that does not focus on unit testing, but, equipped with the things that I learned from this book, I am now even more adamant that I will be creating unit tests for all of my future Perl code.

Unlike Python’s core testing library, unittest, which is focused on objects and test methods, Perl’s core testing libraries, Test::Simple and Test::More, are focused on procedural style testing. As a consequence of being procedural, Perl test code has a style that reads very differently from a Python test case, and it is this style that was so eye opening about the Perl Testing book. The style difference isn’t a bad thing, it just requires some mental adjustment shifting.

Perl Testing is written in a no-nonsense manner that jumps straight to a solution for how to solve some hard problems when testing Perl. Personally, I think that the book’s style makes the material such a useful resource when considering how to test a problem. The Perl community likes to say TIMTOWTDI, which means “There is more than one way to do it,” but sometimes there are too many ways to do something. Langworth and chromatic provide lots of solid examples of how to test things so that you, as a future Perl test code author, will not have to recreate the logic necessary to test some really challenging code.

The book isn’t perfect, but the overall quality of the material, and the incredibly helpful libraries that it introduces, makes Perl Testing: A Developer’s Notebook a valuable resource for any Perl developer who wants to test his code (which should be every Perl developer).

My previous post on installing Entertainer proved to be quite popular. Since quite a bit has changed in Entertainer between 0.1 and 0.3, I’ve decided it would be worth writing the instructions again to prevent confusion. However, for the benefit of people who never see my blog but will visit Entertainer’s Lauchpad page, I have decided to provide the instructions as a FAQ in the team’s Answers section.

Please visit the FAQ for how to install Entertainer 0.3. My apologies for the redirection, but it is for the benefit of many.

This should be educational:

matt@eden:~$ sudo apt-get install perl-doc

matt@eden:~$ perldoc perl

(and all associated sub-parts).

Then maybe I’ll start hunting around on the CPAN for modules or at least figure out which Perl modules Ubuntu bundles by default.

(Possible alternate title: Becoming a Better Perl Developer)

What!? I have a blog!? I guess I should say something. 🙂

I recently worked on improving the translations workflow for Entertainer, and hopefully this work will help make Entertainer rock for i18n (which is short for internationalization in the global community because the word is very long, 18 letters long, to be exact).

In the last Entertainer release (0.2), Joshua Scotton did the trailblazing work of adding gettext support to Entertainer. Gettext is a very common method of making an application translatable. For every string that a user sees in the interface, we wrap that string with the _() method in the code. For example, we might have a line that says:

print _(“Hello”)

Entertainer developers could then run a series of commands that will tell gettext to look for the _() method and extract the contents of all method instances it finds into a file called a po template (pot file for short). We upload this pot file to Launchpad translations, which enables our translators to translate the language into their native tongue.

Launchpad lets translators work through a web interface to see a string from the code so they can provide the translation. Optionally, Launchpad will let a translator download the file that contains the mapping from the reference language to the destination language. This file is called a po file. Once the translator updates the po file, they can upload it back to update the translations in Launchpad.

Josh did a great job adding this initial support for translations, but unfortunately, the team dropped the ball on keeping them up-to-date. Since code continues to change, one can deduce that the strings that a user will see will also change over time. Some strings are deleted. Some strings have wording changes. Other strings are added. For technical reasons not worth enumerating, the developers lacked a super simple way to generate a new pot file and upload that file to launchpad to keep the translators in sync with what is happening in the trunk. Because it was non-trivial to update the pot file, our pot file was out of sync with the code for four months. Four months! On a project that is changing as rapidly as Entertainer, that is a very long time.

My recent translation work provides the simple solution that the developers needed. Now, by simply typing `make translations` in a bzr branch of Entertainer, a new pot file will be generated for a developer to upload to Launchpad. With this change, the development team will be much better equipped to provide steady updates to the translators.

If you’re interested in translating for Entertainer, jump over to our Launchpad translations and give us a hand in making Entertainer useful for whatever language you speak. It’s a great way to contribute, especially if coding is not your thing.